Showing posts with label Papercraft. Show all posts

Saturday 2 October 2021

The Perfect Gamer Notebook?

I have recently taken up the mantle as session reporter in the Savage Worlds Hellfrost game which is run every Friday night at my game group Dragons Keep Roleplay Club, in Chislehurst, South East London.

I've been using a less than practical A6 sized filofax style notebook that I bought as part of my Random Wish Roleplay Stuff challenge.  This got me thinking about...

What Should the Perfect Gamer Notebook Look Like?

The criteria are simple.  It needs to be:

  • Sturdy and Secure - Your notebook will get tossed into a bag and rattle around with all of your other Roleplay gear so a sturdy cover is essential.  An elastic ribbon or similar to keep it all closed up would be double handy too.

  • Good for Mapping - Having squared paper is essential when you get tasked with being the map scribe for the night.

  • Lined for Legibility - My penmanship is not great at the best of times so having lined paper is an essential to keep your notes in check

  • Good for Sketches - Sometimes you just need a space to sketch.  Maybe it's a character portrait, maybe an object or a symbol.  Having an unlined plain white background is useful if you want to digitise the image

  • Session Info - A space where you can write that all important session info like date or session number.  Very helpful when you are playing multiple different games.

  • Loose Pages - Having ring bound pages is a great way to keep your campaign notes organised.

  • Compact and Bijoux - Let's face it by the time you have your rulebooks, character sheet, pencils, dice and tray, snacks and a drink on the table there's not much room left.  Having a large A4 sized notebook is probably a step too far, A5 is about the maximum size for the cramped playspace and still be a useable size.

Have you seen a great notebook.  If so pop a comment in the box below.

Roleplay Notebook


Wednesday 16 December 2020

3 Things You Need When Collecting Vintage Board Games

Sometimes a bargain vintage boardgame comes incomplete.  Sometimes you can only afford to buy the incomplete ones.  

Don't fret, you can probably fix that game up and replace those missing components with some hand made ones.


  The three tools I have found indispensible for this are:

  1.  A Printer Scanner Copier - even a cheap and cheerful budget version will produce more than acceptable results.

  2. GIMP - the free image editor takes a bit of getting used to but is essential for manipulating your scanned card fronts and backs into printable files.

  3. A Laminator - inkjet printed cards soon disintegrate so running them through a laminator will make them a bit more substantial and resistant to cheeto fingers.


Monday 5 March 2012

Roleplay Geek Publishing - New Product - Sci-Fi Scenics Set 1 - Hover Taxi and Hover Car

RGP is proud to announce the first in a new line of Paper Miniatures with the release of RGP011 - Sci-Fi Scenics Set 1: Hover Taxi and Hover Car.

Populate your street scene and spice up your firefight with this papercraft hovercar suitable for any sci-fi roleplaying game such as Cyberpunk, Traveller or Judge Dredd.  8 different colour variants available (1 vehicle per sheet) including:
  • Yellow Taxi Cab
  • Orange
  • Red
  • Green
  • Blue
  • Purple
  • Grey
  • White
all for the low, low price of only $1 dollar!! (that's 63p in old money)

Saturday 25 February 2012

RPG Papercraft: Judge Dredd H Wagon and Riot Tank

It's been a couple of weeks since I posted anything as I've been busy papercrafting again.  In honour of the 35th Anniversary of Judge Dredd, here's some photos of the prototype H-Wagon (and Riot Tank variant) I've designed for my upcoming Judge Dredd game.

UPDATE:  I've now created a 3D printable H-Wagon for use with 15mm sci-fi miniatures.

H-Wagon configuration - Front Quarter(The interior floorpan measures 3" x 2")


H-Wagon configuration - Rear Quarter
(The model will come with six detail boxes
which can be glued anywhere you like)

H-Wagon configuration - Underside (showing off the grav plates detail)

Riot Tank Configuration  (the tank "lid" just slots in place, so you get 2 models for the price of one)
 

Sunday 20 February 2011

Papercraft: Ruined Columns

My regular Friday group began another chapter in their on-going campaign which called for them to explore an ancient ruined temple.  The scenario I'm DMing is lifted straight out of an issue of Dungeon Magazine and the map of the temple is dominated by a huge room with lots of toppled columns, some of which have crashed through walls exposing new routes and blocking off others.  I drew out the main room and was particularly unhappy with the result, it was hard to replicate the adhoc passageways and the columns just looked like giant frankfurters, so I decided to make some ruined columns of my own.

As I've found with my other papercraft projects like the Adventurer's Cart, a 3D element can be a real game changer when it comes to combat, so I quickly knocked up a design for a large 4" column and a short stubby 2" column using Google Sketchup and the Unfold Plug-in (See my Papercrafting article for more info) and then exported them as 2D artwork into Photoshop for resizing to the correct scale.

Once printed and cut out they're very easy to put together as they're simple tubes.  I inserted a large bolt into each column before sealing them up, it's not essential but it acts as a weight to keep them from toppling over when the player's get excited. 
Enjoy, and don't be afraid to drop me a comment with other papercraft suggestions.

    Tuesday 9 November 2010

    Trouble with Torchlight - Part 1: Ideas

    A session of a recent Diamond Throne game I played involved a short dungeon crawl.  The age old problem of lighting for the non infravision equipped players reared it's ugly head.  This got me thinking about ways to show the limit of torchlight in different ways, without turning this into a massive maker project.  I thought I'd brainstorm the options and jot them down here and then produce a few prototypes and document how each one works in a game.

    2D Templates

    The simplest (and perhaps most obvious) of options to make is a flat template:

    Pros & Cons:
    • flat and therefore easy to transport in a flap or a pocket in a ringbinder.
    • easy to make, print on OHP (Over-Head Projector) film and cut out.
    • cheap.
    • can't simulate the height of anything
    Idea 1: Single Zone - this template is the simplest to make, just use a compass to scribe a circle of the appropriate diameter on a sheet of stiff transparent plastic.  A good source for the plastic is packaging windows, you know the ones, the boxes from those toys you bought for Christmas with the big plastic windows so you can see what you're buying yourself.  There's no need to print anything on, but if you make lots of different ones for different effects you might need to write effect names on them with Permanent Marker. 

    Idea 2: Multiple Zones - Slightly harder to make, and you might need to design something on the computer and then print it out onto OHP film.  Another way is to stack them on top of one another, pin or fix together with glue to show different effect zones.  If you can't get hold of coloured transparency film then colour with careful use of permanent marker.  The zones don't even have to be for the same game, the possibilities are up to you.
    A 2D Multi Zone template

    3D Templates

    Same as 2D but with the added dimension of ... height. 

    Pros & Cons:
    • They're 3D so probably won't fold and therefore difficult to transport
    • Harder to make or find suitable component
    • More expensive
    • Bulkier in play, do they interfere with other miniatures, move them
    Idea 1: The Dome or Tub - Finding suitable components for this will be tricky but I should have at least 1 by the time I write Part 3.  Some options are plastic soft drink bottles, CD drums, caps from Frappucchino or smoothie cups.

    Idea 2: The Ring - a simple ring of stiff transparent plastic which stands on it's rim.   This I will definitely try to make.  A more advanced design would be adjustable like a belt so you can expand the ring for different sized zones.  The width of the ring can be made to simulate the height of an effect.  I'll make the belt style and try it out.

    A Ring
    Idea 3: The Cone - A cone of transparent plastic which can be placed over a miniature.  Cones stack inside each other for transport.  They can also be made out of a flat sheet of stiff transparent plastic like OHP film.

    A Cone
    Idea 4: The Cube - a transparent box which can be be created from flat sheets of stiff transparent plastic.  Sounds like papercraft to me, let me at it.

    The Weird & Bizarre

    A combination of 2D templates with a stand or something totally different.

    Pros & Cons:
    • clumsy to use in play
    • expensive
    • hard to make
    • hard to store
    Idea1: Tripod & Torch - Use a length of stiff wire or a wire coathanger and a pare of wire cutters to make a rudimetary tripod and a ring over which you can hang a small torch.  If the torch has a beam focus you could use it to give different size effect areas.

    Idea 2: Tack and String - Less of a template and more of a measuring device.  Push a pin into the base of a plastic miniature then knot lengths of string to the pin.  Trim the string to the appropriate length or if making a multipurpose string add coloured tabs to the string.  Each miniature then has a handy radius measure

    Idea 3: Radius rod.  Using a thin brass rod, dowel or heavy gauge wire.  Thread a 2D template onto the rod through a hole in it's centre.  A step or a blob of glue can be used to stop the template falling off the rod during use.  Templates can be removed for storage.  I'll have a go at this one.

    If you've got some ideas that you want me to explore in prototype, feel free to comment below and if they pique my creativity I might just make them.  If you've got any prototype pics you've made yourself feel free to add links.

    Monday 13 September 2010

    Papercraft: Cart Horses

    Following up from my post yesterday about techniques for making Paper Miniatures (and to accompany the Adventurers Cart I posted a few weeks ago), here's a PDF with some Cart Horse miniatures.

    Sunday 12 September 2010

    Paper Miniatures

    I read with interest the detailed instructions in NewbieDM's Tutorial – Counters, Tokens, or Pogs and thought about sharing some of the techniques I've used for creating paper minis over the years.

    Standee Styles

    There are a couple different styles of standee that I've made over the years most are either:

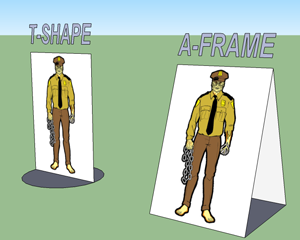
    • A-Frame where the assembled miniature when viewed from the side resembles a letter A. The base ends either lock into each other or are glued together to form a square base.

    • T-Shape where the assembled miniature resembles an inverted letter T.  I find this type most useful as they fold flat, take up less storage space and stand vertical.
    Source your Images

    I use a variety of sources for images Googleing works well, but my favourite (particularly) for PC and NPCs is the HeroMachine.

    Build your Standee Template

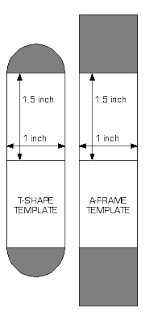
    In your favourite image editing package (Photoshop, GIMP) build a template for each standee using guides.  I usually use a scale of 1" = 5' so each humanoid standee base is either 1" square or round.  Mounted or monster miniatures will of couse be much larger.  Make sure everything is merged into 1 layer and then duplicate that layer to make a whole bunch of standees.

    Add your images

    Once you've chosen your images paste them into your template on a new layer and scale them to fit your template.  Make sure to proportionally scale the images otherwise your elf may look more like a dwarf and vice versa.

    Once the frontside image is in place, duplicate that layer and flip it upside down, this becomes the back of the figure, move this backside layer so it is vertically above the frontside.  I then turn this into a sillhouette by changing the hue/saturation until the figure is all black.

    Repeat this for each backside image and add a little text to number each miniature and you should get something resembling this:

    Cut, Fold and Glue

    All you need to do now is cut fold and glue the miniatures together and hey presto... your own zombie army!!

    Plastic Bases

    There are a few manufacturers out there who make an assortment of bases for use in boardgames and can be picked up very cheaply (£1 for 20).  These minis tend to be a little more economical as you don't need to waste as much paper and ink printing out the bases.  Just leave yourself a little rectangle of paper at the bottom of each mini to slot into each base.

    Monday 30 August 2010

    Papercraft Obelisks

    Sersa V at Save Verus Death posted some nice papercraft obelisks which I had to build.   Perhaps this will be all the encouragement I need to run the Desert of Desolation again.  Here's a pic of how they turned out:

    Thursday 26 August 2010

    Papercraft: Adventurer's Cart

    Something I've been meaning to put together for a while and with the help of Sketchup and the Unfold plugin (see my previous post for details) here it is...

    The Adventurers Cart!!

    Every party needs a cart to get from Town A to Village B and when you've slain the Dragon you need something to haul away it's horde.  For DM's sometimes it's just nice to make the PCs have a good old punch-up around a few wagons.


    Build instructions:

    Normal rules apply; cut along solid lines, score along dashed lines, put tab A into slot A etc. 
    I used chopped down cocktail sticks to secure the optional roof.

    Enjoy

    Saturday 21 August 2010

    Papercraft: Sketchup and Unfold

    Installed the fantastic Unfold plugin for Google Sketchup the other day which makes the job of unfolding your sketchup designs into flat planes ready for papercrafting.  Here's a skyscraper I made to demonstrate the end result (it took no more than 30 minutes from start to finish).

    Papercraft: Gaming Sci-Fi vehicles and Terrain

    Those of you who have met me in meatspace, I'm a tight-fisted Northerner, and love to make my mini's and scenery rather than buy them.  I'm always on the look out for nice papercraft models to jazz up my Tapletop or RPG games.

    Here are some lovely papercrafts from a very talented designer at www.topsolitario.com, of particular note are:

    Samsara

    Awheeled APC with numerous cockpit, body and turret options to keep you occupied.


    UHV200 Walrus
    A hover APC with lots of body options to make ambulances, trucks or more offensive attack craft.

    El O-12 ISO-CONTAINER M.A.S.H
    A Mobile Hospital made from ISO Containers with additional airlocks.  The model can be modded with magnets to quickly snap it together in different configurations and keep it there.